Showing posts with label cards. Show all posts

Sunday, August 7, 2011

it's heeeeeeere...

It's finally here! The A Muse Studio Holiday Catalog & Inspiration Guide! 40 pages of brand new Fall, Halloween, Winter, Christmas & Valentine's Day stamps, papers, dies, inks, washi tapes, embossing plates and more! Take a look at the catalog by clicking the link above, and then head on over to my online A Muse Studio Store right here to place an order! And remember, an order over $150 qualifies for free product and, during A Muse A Palooza, a free hostess stamp set! So, if you are placing a large order, or have a few friends who might want to order together, contact me about placing your order as a workshop! Just e-mail me at missmorganteaches@gmail.com

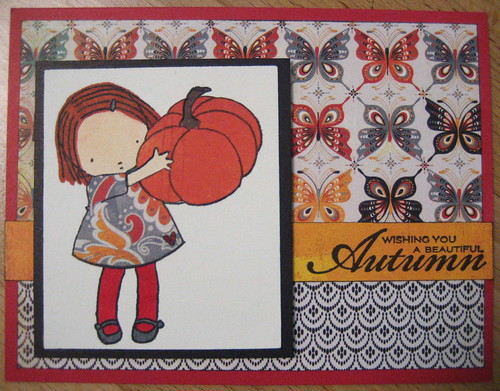
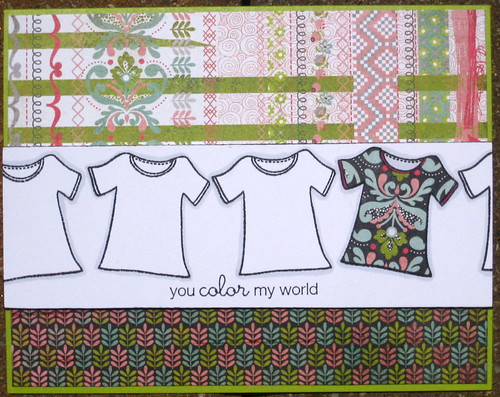
All the products have just started shipping and I've already had a chance to play with some of them! How much do you love that grey striped washi tape from the holiday washi tape set!? A Muse Studio already sold 4 sets of Washi Tape (Winter, Spring Summer & Fall) but now we also sell this Holiday set along with a really rich Metallic set! I decided to dress my deer up with a cute little ribbon scarf and add a little touch of the brand new "wasabi" green cardstock. I can already tell that it's going to be a new go-to color for me. This sweet little deer is from the brand new "Nordic Noel" stamp set, which I also used to make my next card...

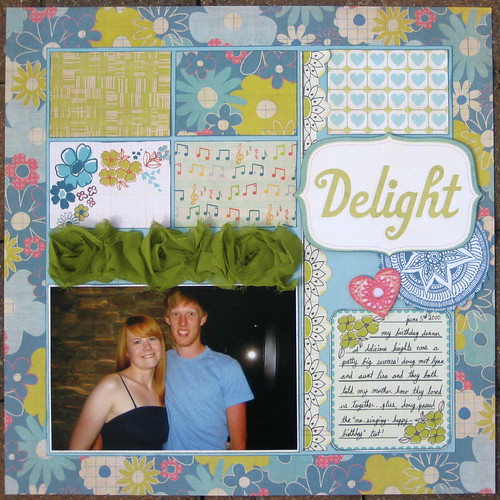
... this guy! For this one, I went with a weathered patterned kind of look using a lot of the images from "Nordic Noel" the Versamagic watermark ink pad, White Embossing Powder and a heat gun. Then I added another little touch of Wasabi, the brand new Cherry Woodgrain Cardstock (also comes in Slate, French Roast, Sky and Latte) and another new addition to the A Muse Studio toolbox, Cherry Bakers Twine (also comes in French Roast and Onyx!)

My next order is definitely going to involve stocking up on some of the cute new Halloween products! They are so fun, and Halloween has always been one of my favorite holidays to make cards for!

Until then, check out the catalog, place an order in my online shop or contact me with any questions!

Card Supplies:

Winter Gear Deer Card; Stamp Sets(Nordic Noel and Essential Sentiments), Cardstock (Cherry, Wasabi, Candy Cane & Sugar), Pigment Ink (French Roast & Cranberry), Grass Stitched Grosgrain Ribbon, Holiday Washi Tape and Foam Tape.

Noel Card; Nordic Noel Stamp Set, Cardstock (Cherry, Wasabi and Cherry Woodgrain), White Embossing Paper, Versamark Embossing Pad, Cherry & White Bakers Twine and foam tape.

Sunday, April 3, 2011

a muse studio plays well with others...


welcome back to my little a muse studio launch blog party! a muse studio happens to sell some awesome pattern papers, damask, mini gingham, polka dots and a few more, but i am a total paper addict and love to use scrapbook paper from all my favorite manufacturers too!

the infamous "to go" cup! i use this guy alllllll the time for every holiday, season and general card that i can think up because it's just so fun to paper piece! and now, with the launch of a muse studio it's been re-released in cling rubber with a whole bunch of perfect sentiments, an espresso machine and a couple of mugs in a set called, "the perfect blend." i love it so much, that this set was even in my friday faves!

(french roast ink pad, foam tape, onyx paper for the card base)

i am loving these bright, cheery colors right now, along with the mix of stripes and florals, blame it on the "botanica" section at anthropolgie! this brand new, "life is a song" stamp set is quickly becoming a new favorite for me, kind of for the same reason that i love "the perfect blend" so much, it's great for all ocassions, color combinations and super easy to use! it comes with 4 different birdcages and 2 interchangable chains, 3 birds, these cute music notes and a whole slew of sayings that can be mixed and matched. there is also a really nice "with sympathy" sentiment in this set. for this card i used a line of onyx twinkle stickers to make my own chain! it's nice that they come on a line of adhesive so that you don't have to worry about lining them up straight!

(tuxedo black memento ink pad, papaya ink pad, onyx twinkle stickers, cherry solid paper for the card base)

ohemgeethesepeeps! i love this little guy! and now, he comes in a fun set called, "for peep's sake" along with the sentiments "for peep's sake" and "to one of my favorite peeps" in a cute new font (i used my old stamp here), along with a spring chick, a buny with a basket and a couple of larger easter sentiments. lot's of cuteness in this one! for this card, i just stamped my peep 3 times, in 3 different ink colors, on a piece i punched and layered using my labels 4 nestabilities and then when the ink was dry i went over them with my quickie glue pen and sprinkled diamond glitter on top to give them that sugar loaded peep look!

(papaya ink pad, bubblegum ink pad, grass ink pad, french roast ink pad, quickie glue pen, diamond glitter, grass solid paper for card base, labels 4 nestabilities)

this is another awesome, go-to set! "happy everything" really does cover just about everything with mix and match sentiments and a cute triangle banner! i also love how large the words are! it makes it really easy to get a more masculine card if need be because it doesn't even really require an image stamp!
(french roast ink pad)

don't forget, one of the customers who places an order in my a muse studio consultant shop this weekend will win the "just my type" stamp set and R32 peach, BG10 cool shadow & W6 warm grey no. 6 copic original markers that i used in this how-to! just place an order this weekend and then e-mail me at missmorganteaches@gmail.com to let me know that you did so that i can make sure that you are entered into the drawing!

Saturday, April 2, 2011

a muse studio - typewriter card step by step


hey all! thanks so much for following along on my little consultant website launch journey! today, i'm going to show you how to make this cute. "typewriter thank you card." and, after this weekend is over i'll pick a lucky customer to win the, "just my type" stamp set and the 3 copics that we'll use to make this card!

the first thing i did is gather all my supples and pick a color pallet for my card. for this particular card i was inspired by those beautiful vintage royal typwriter colors we always see! the papers used are; slate solid, bermuda solid, vanilla solid, onyx gingham, school lined & bubblegum shimmer couture damask.

i love that the new a muse studio stamps are that quality red rubber that we all love, but with the ease of a cling stamp! another great feature, other than the fact that they come completely put together and pre-cut is that the image is printed on the cling part of the stamp, so it's super easy to place your stamp correctly! okay, on to our cardmaking!

step 1: cut a 1" x 1.25" rectangle of the school lined paper and use your slate ink pad to stamp "thanks so much" up towards the top and then distress the edges lightly with your tuxedo black memento ink pad. set this piece aside for later.

step 2: let's make our typewriter! go ahead and stamp your typewriter on vanilla paper using the tuxedo black memento ink pad and then circle punch it.

step 3: it's time to color, the photos above will make it easy to see what's what color wise as you go along. first use R32 peach to color the body of the typewriter. next use W6 warm grey 6 to color the return, space bar & sides of the keys. Lastly, use BG10 cool shadow to color the "inside" of the typwriter and tops of the keys.

step 4: now it's time to insert our little "typed" message. use your exacto knife to cut a slit along the bottom of the "paper roller". flip the typwriter over and put a small line of adhesive on the back, below the slit then flip it back over and slide your typed message in. lastly, put a small piece of foam tape behind the top of your typed message so that it looks like it's coming up out of the typwriter!

step 5: punch a scalloped circle out of slate paper and attach your typewriter circle.

step 6: make a bar 4 (3.5"x5") card out of bermuda paper by scoring and folding a 3.5"x10" piece in half.

step 7: cut a 2.5"x4.75" rectangle of onyx gingham paper and a 1"x4.75" piece of bubblegum shimmer couture damask and lightly distress the edges of both using the tuxedo black memento ink pad.

step 8: attach your onyx gingham straight onto your card so that it's even at the top and sides.

step 9: use foam tape or pop dots/squares to attach your scallop based typewriter onto your card so that it's to the right of your card and the bottom of your typwriter is even with the bottom of the gingham piece.

step 10: attach foam tape to your card as pictured above so that you can attach your "tabletop" paper at the same depth as your typewriter.

step 11: attach your bubblegum shimmer couture damask "tabletop" to the card so that it lines up nicely with the bottom of the typwriter.

step 12: cut a teal heart from the a sheet of heart twinkle stickers and stick it right onto your typed message. ta da! you're all done!

wasn't that easy peasy? think of all the different color typewriters you could make! i happen to be kind of addicted to this color combination right now, so i thought i'd share 2 other a muse studio cards that i've made using it!

scooter from the "ooh la la!" stamp set & sentiment from the "sushi & wasabi" set (which is another favorite!) also, don't you love that polka dot organdy ribbon? it's another addictive product from a muse studio!

umbrella from the "bridal beauty" set (i use this for all kinds of things, especially under the weather and bad day cards!) & sentiment from the "wild rose" set.

i hope you enjoyed my little step by step how-to! and don't forget, one of the customers who places an order in my a muse studio consultant shop this weekend will win the "just my type" stamp set and R32 peach, BG10 cool shadow & W6 warm grey no. 6 copic original markers that i used in this how-to! just place an order this weekend and then e-mail me at missmorganteaches@gmail.com to let me know that you did so that i can make sure that you are entered into the drawing!

don't forget to check back tomorrow for 4 brand new cards i've made to show you just how nicely a muse studio cards play with some of my favorite scrapbook papers!

Wednesday, February 9, 2011

an anti-valentine.

even though i'm loving love, i have spent my fair share of valentine's days single so i thought it would be fun to represent the singles with a little anti-valentine for the craft critique valentines day blog carnival.

anti-valentine

i dug deep into my stash for this card, using one of my favorite papers from the old "obscure" collection by basic grey. tina was nice enough to let me borrow her polaroid stamp from studio calico and with some masking i was able to combine it with the miss anya stamp from the "special autumn" set by the greeting farm. the "love is for the birds" sentiment is old school a muse! i also pulled out my wrmk sew easy tool for a little easy-peasy stitching detail. (copics used; w1, w3, w6, w9. rv19, bg75, yr000 & pitch black spica)

kitty helpers

p.s. this is what happens in our house when you attempt to photograph anything on the floor, haha.

Wednesday, December 29, 2010

a little preview of things to come perhaps...?

just rocked a pretty big update to my etsy shop; 7 rockpaperscissors paper crafting kits inspired by songs & 3 new sets of cards. another update will be coming soon with more cards & cupcake toppers, just as soon as i play a little december daily/journal your christmas catch up!


Etsy
leftandleaving

Wednesday, November 24, 2010

happy thanksgiving!


autumn card

it's been pretty stressful time lately, so i'd like to take a little time to list who & what i am so thankful for...
  • a wonderful guy who gets me, makes me giggle and makes me feel like my love is 100% safe with him.
  • real friends who i can pick up with at any given time and get the real deal from.
  • an awesome family & lovely kitty loves, and a great new extended family via the boy.
  • a new home, with the boy that i love, that's getting cozier and cozier each day.
  • some new creative energy that has me enjoying crafting, at a time when i definitely need it.
happy thanksgiving everyone!

Friday, September 10, 2010

friday five #37

friday five #37

01. new fave ink combo - "crushed olive" distress ink, "pumice stone" distress ink & "ocean depth" versamagic. i usually forget to pull out the distress inks, but i remembered for once, and this card happened. i die.

02. terrariums - yeah, obviously i'm a little late to the game on this one. i love the idea of green things around the house, but i don't have the greenest of thumbs and kitties have a tendency to eat plants and flowers, plus the possibility of starting out has seemed a little overwhelming. but, through one place or another i ended up on this website, and it seems like something i could start playing with on a quasi-reasonable budget. hmm...

03. blue india - i bought this shade of nail lacquer from the "liberty of london for mac" collection a little while a go, but was totally hooked on my barry m "mint green" up until a couple of weeks a go. "blue india" is going to be my go to fall color, i can just tell. it's the perfect grey blue and i only really see it ever leaving my nails if replaced by mac's "in the buff", "earthly harmony" or "jade dragon".

04. dream recipe box - in a dream world where i have unlimited monetary resources and split my time between traveling and nesting, this is obviously the recipe box i would be filling. it's custom, made from salvaged hardwood and completely beautiful. sigh.

05. gym revival - i'm taking the plunge back into having a healthy workout schedule. i'm definitely going to also try to eat just a tiny bit better, but will not diet. this is more of a gym revival to maintain my ability to eat out and try new beers on the weekends. whatever works, right?

Monday, August 23, 2010

some more crafty

"Delight"
this is my layout for our layout sketch flyer at the store this month. this picture from my birthday dinner seemed like the perfect fit for the brand new "indie girl" collection from sassafras. i'm not usually a vintage flowery kind of girl, but there's something about these colors that make me all lovey for it! plus, i even used a precious 6 inches or so of my webster's pages bloomers! can't wait for the new colors to come out for the fall!

july 4
this was a really fun experience, getting to watch the 4th of july fireworks from the top of the fire engine, all cuddled up sitting on the hose bed with my sweetie. you can't really tell from this picture, but i also used one of my favorite glimmer mist colors, "graphite" on the scalloped layer of the triangle banner. these maya road triangle banners are the best because you can make them match whatever theme or color scheme you want, they don't have to be girly!

life is good
i just taught this class a couple of weeks a go, so i haven't had a chance to put pictures in it yet, but i'm really into these mdf photo displays from kaiser.

hey baby! onesie
just a quick, fun little cutie from my "olivia" paper pad class. grey & pink for baby girl stuff = love.

color my world
this is not my normal style of card, but i have to say i love how it turned out. i just stamped and cut out all those little dresses and was inspired from there.

tee card
this is almost like my more traditional (for me) take on the card above. and another one from my "olivia" card class.

Thursday, June 3, 2010

in the cards...

yeah, that's right. i did just use a totally cheesy blog entry title. deal. just a little bit of the crafty things i've been doing lately, at least the cards portion.

this is one of the cards i'll be teaching in the "max & whiskers" edition of my recurring "maximizing your 6x6 paper pads" class series.

and this is one of the cards from this past month's installment using the old school-ish "granola" paper pad. i can't believe that "granola" was my 12th paper pad class! i'm really glad that i still enjoy teaching them so much.

this little lady was my card for this month's card sketch at the scraptasia, it goes up tomorrow, so shush! loved using the hamly stitch rub-ons to "stitch" the two patterned pieces together.

gigi showed me how to make these cute scrap flowers a while a go and i passed them along in how-to form last week on the store blog after...

... i was inspired by the rosette how-to on the hero blog that i used to make this card. p.s. i don't think i'll ever be over this collection from crate paper!

just a little peek into my card pile. i have new layouts to share next week that i'm pretty excited about too.

Tuesday, May 18, 2010

in pairs...

lately, i'm noticing, i've been making things in pairs. i don't know if i'm not getting my idea all the way carried out the first time and so i want to keep going, or if it's that i'm liking what i'm doing so much i'm wanting to build on it. who knows. anyway, here are a few pairs of similar cards that i've made lately.

i made this graduation card for the boy's brothers graduation from indiana university and let the new "happy everything" stamp set from a muse do the talking. dude cards can be hard sometimes, because 90% of image stamps are a little too girlie or young, but with this stamp set and one of my favorite papers from the basic grey "ambrosia" collection which happened to include the IU "crimson & cream" i had an easy peasy grad card.

same deal with this guy, a simple, graphic card using the same stamp set and the punched circles leftover from a layout that i'll share soon. these colors (along with a pebble, salmon, chartreuse and light teal) are one of my main color combo obsessions right now.

i may have no business using these "pure innocence" girls as much as i do since i don't have kiddos or anything, but they really are sweet, fun to color and total stress relief when it comes to just coloring and...

... paper piecing. i love to put together their little outfits with current favorite papers. and obviously i'll be using this "hip to be square" saying with tons of stuff.

these two cards are ones i made sets of for one of my favorite people in the world, nicole's birthday (if you're reading this nicole, surprise!) since i was making these into boxed notecard sets i really kept them simple so that the mass production would go smoothly. plus, with these girls, it's fun to let them do the talking. they were perfect for miss nicole who teaches yoga...

... and runs her own awesome burlesque (both in person and through e courses) business, pop fizz, that centers around the idea of being comfortable in your own skin rather than performing for someone. love. anyway, cheeky cherry was perfect for this, and again, kept it simple.

so, just a little peak and what i've been up to lately craftwise. i'm having a little trouble deciding exactly what this blog is lately. i love sharing my fives and mixes, but when it comes to crafty things i find myself writing as if this is the store blog instead of my own, which i have to get over. i might just start posting pictures of craft things and leaving it at that. i also don't know what to do about personal things here. just trying to figure out the blog balance i guess. i'll get there.

Friday, April 30, 2010

friday five #24

cheated on this one quite a bit. : / in that these are all quick inspirations found in my google readed browsing this afternoon, haha. you can def tell where my color sensibilities are recently. i'll obvs be sure to link you to all the lovely bloggers also.

01. tropical nail colors - if you're going to put in the nail polishing time, why go with a traditional color? these "up, up and away" colors from china glaze are sooooo where i'm at right now. love how their solid, almost matte look brings me back to the "clueless" era of painting my nails with whiteout in class. (source: a beautiful mess)

02. foxes of the non-fantastic variety - i finally watched "the fantastic mr. fox" last night, and i know i may get killed for this, but i didn't love it! i really thought i was going to! almost all of the adorable, snarky & funny bits were in the constant promos, and i found their arms and bird killing terrifying! i did get a nice language clean up from it though, and will now be saying "clustercuss" rather than the other. i do however love these fox pillows, this fox plushie and this fox hat, which i obviously need for next winter!

03. diy bunting necklace - sarah golden, owner & artist behind craftyfolk posted this sweet, easy to create diy leather bunting necklace. i'm imagining how cute it would also be with little frayed edge, back to back fabric triangles. the possibilities...

04. dividing walls made of magazines - this is from a rad, albeit in another language, design & packaging blog i follow. check out these amazing dividing walls made of packed in magazines, complete with windows and sills! we won't even talk about how badly i want their conference room chairs!

05. mixed postage prettiness - parcel post is another inspiring blog to follow, and i love when they do mixed and vintage mixed postage on envelopes. it makes me want to hold on to some random postage stamps now, in hopes that they'll someday look cool with some other randoms. also, feel free to raid your grandma's desk drawers for postage for me if you like. i wouldn't turn them down.

Thursday, April 22, 2010

some cards...

just sharing some cards from the last couple of months real quick! this guy was an easy-peas-y card to showcase on of the new jenni bowlin embellished butterflies. it also features a perennial fave, the october afternoon stripe. they are always good, no matter what collection they are from! (that free form scripty "hello" is from a muse)

this little chickie was one of the cards in my "garden variety" paper pad class. i didn't think i was really going to be into these "pure innocence" girls from my favorite things, but i also used this girl on my london rain layout, and i have to say, sometimes it's just cheap therapy to sit and color. especially when you're using the copic markers, they make it all so easy.

obvs it's been a little while since i made this dude, but he's still cute! i stamped this bunny stamp from unity stamp co. onto kraft paper and cut him out (it was super easy because he has such a nice basic shape) and also stamped him on the musical note paper from "dear lizzy" to paper piece his tummy, inner ears & little bunny nose. the "growing green" paper (also from "dear lizzy") made a great easy background for him and then i cut a flap, added the egg paper and called it a day.

this was the easter card i made for the boy. he has an affinity, an unfortunate one, for neon yellows and greens, so i glittered over the a muse "peep" stamp with 2 of the brightest doodlebug glitters i could find, perched it on a card base made out of an american crafts "moda bella" paper i've had sitting around for a while and added it to his easter basket (which was an overturned little kids firefighter helmet!)


this card is a product of our april sketch pamphlet at scraptasia. we used a card sketch by becky fleck and each took it for a spin. it was pretty cool how different they all ended up looking! for mine i used one of my current paper obsessions, the "brook" collection from crate paper and this rad little snag 'em scooter stamp along with the "don't forget to have a little fun today!" stamp from a muse. love, love, love how fun these bill envelope sized cards are!

a couple of weeks a go i taught a bridal shower "class" where everyone who came made the bride's thank you cards in the class and that way she walked away with 200 thank you's in her wedding colors (which are raspbetty & navy), all handmade and ready to go. it was pretty interesting to create something that was less about my style, and more about what she would love to send. for sure, this is my favorite card of the bunch, simple but still my style!

Thursday, March 18, 2010

what i've been up to...


* say what? - i've taught this game a couple of times over the past couple of weeks and now that i'm done using it as a class sample i'm pretty stoked to fill it with favorite quotes, tweets, status messages & things overheard. it's 25 plus pages of atc sized pages. favorite patterned papers on the front with stamped kraft paper on the back, so it would be easy-peasy to add even more pages at any time.

* st. pat's game - the st. pat's game was last night and it was everything i hoped it would be, haha. jessica & roger and doug & i decked ourselves out in red, green & white and headed to the prudential center to watch the devils rock their old school jerseys to play the penguins. the devils got the win for a complete series shut out of the penguins and we got to watch crosby eat it. loved the devils get the shut out against last year's stanley cup winners, loved the chants of "crosby sucks" and then "you can't beat us" for the final 3+ minutes of the game, and really loved being there with the boy and j & r on their anniversary!

* designing - i've been working on some more cards just for fun, a layout & a card for something fun that's about to start at the store and some other random layouts for me. but, what i've mostly been doing is a ton of class designing & prep. so many classes coming up at the store and since the product for them all has been rolling in like crazy i've got a whole bunch of plates spinning at once. i'm vending for the store at a crop all day saturday, so i'm hoping i can work on some of all of the above inbetween the obviously forthcoming barrage of customers!

so, not really seeing a friday five happening this week, but i promise i'll get back into my positive 3 a week habits starting next week!